
|
| HOME
PROJECTS IMAGES THEATER ROOM DOWNLOADS VIMEO BLENDER LINKS CONTACT FR. |
DISPLACEMENT MAPPING TUTORIAL.
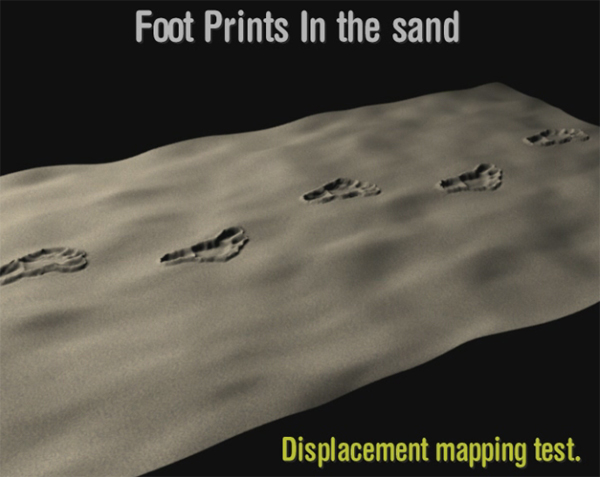
This tutorial shows how to create foot prints in sand, mud or snow.
Creating effects including sand, mud or snow in animations can seem difficult at first glance, but it is not so hard.
Snow is compressible, so it is easier to simulate, and can even been animated by hand, deforming a subdivided mesh.
You can displace vertices groups of the mesh using hooks or shape keys, in the steps of your walking character.
On the opposite, mud and sand are not compressible, and the foot prints are not simple holes in the ground, but are composed of a hole and a rim.
When the sand or the mud is pushed down it slides on the sides and rises around the foot, making a rim
The much easier and realistic way I found to simulate this is using displacement mapping.
If you only plan to make a still picture, one single texture will be enough, but if you want to animate your steps in the sand, you will have to create an AVI animated texture.
STILL PICTURE :
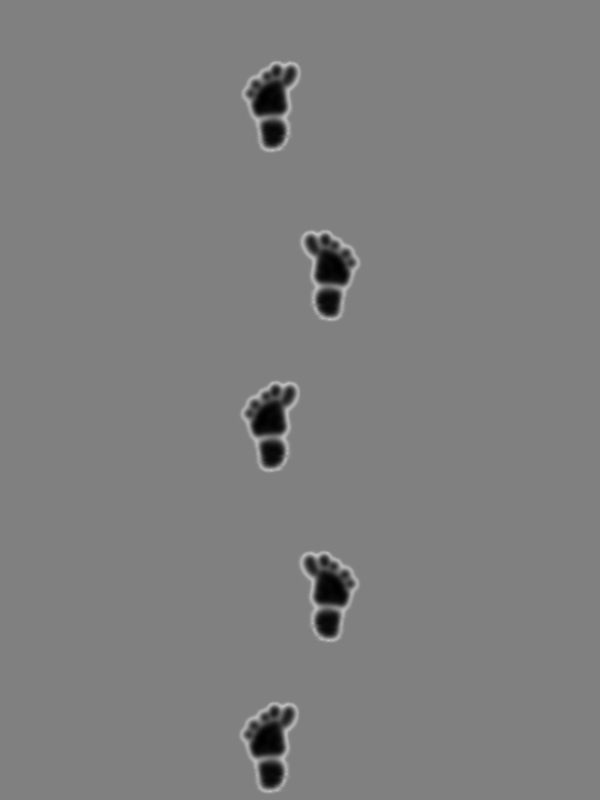
Your texture will be composed in your favourite 2D editing software, like The Gimp or Photoshop, using three layers.
- The background will be a medium grey color (R=128 - G=128 - B=128).
- Add a new layer and draw your footprint in black color.
- Apply the smoothing tool or the blur gaussian filter to this layer.
- Between this layer and the background, add a new layer, and draw a narrow white strip around your foot print.
- This white shape must be larger than the foot print, and will be slightly visible all around the foot shape.
- Apply the Blur filter or the smoothing tool to this layer as well.
- Now, you can export your picture and use it in Blender as a displacement texture on a highly subdivided plane.
Your texture should look like this one :
ANIMATION :
To make the avi file, you will need two textures.
- The first one will be your displacement texture. It will show your foot print done with the method described here above, repeated with right and left foot as many time as needed for your complete sequence.
- The second one, will be a black texture with a short greyscale leading to white, on a tip. This texture will act as an alpha mask applied to a totally medium grey (R=128 - G=128 - B=128 ) plane with a shadeless material.
Your texture should look like this one :

In Blender :
- Create a plane in top view, with the proportions of your texture.
- Give it a shadeless medium grey (R=128 - G=128 - B=128 ) material.
- Add your foot print texture to it. Choose Orco Flat coordinate in Map Input Panel. Select Col in Map To Panel.
If you select the Shaded mode in your 3D window, you will be able to see your foot prints on the plane.
- Create an other plane in top view, with the proportions of your texture.
- Give it a shadeless medium grey (R=128 - G=128 - B=128 ) material.
- Add your black and white mask texture to it. Choose Orco Flat coordinate in Map Input Panel. Select Alpha and Substract mode in Map To Panel.
This second plane will be an animated mask for your foot prints.
- Put this plane just over the first one.
- Select this plane and insert a Loc Key at frame 1.
- Go to Frame 150 (for about 5 steps).
- Select the Shaded mode in your 3D window, to see your foot prints on the first plane.
- Move your mask plane in the walk direction, until the foot prints are fully visible.
- Insert a new Loc Key.
- In the Ipo window, select the curves and make them linear.
You can choose also the Extrapolation mode. Later, this will allow to displace the plane more than 150 frames if you want to.
- Add a camera over your textured planes.
- Select the Ortho mode for the camera, and adjust the scale.
- In the render panel, adjust the height and width of the rendering window to match the shape of the plane without seeing the background of the scene (the world).
As the materials are shadeless, no light is necessary.
- Check the animation and render it.
An example of animated AVI texture is available here :
Now, we can go to the beach :
The resulting AVI texture will be applied on a new highly subdivided plane, which can be slightly deformed with the Proportionnal editing tools, in order to give more realism to your "beach".
- The Animated texture will be set as Movie in the Image panel. Select also Clip or Extend.
- Select only Displace for this texture, in the Map To panel.
- You can add a fine cloud texture and give your material a grey and gold material.
- Add to your cloud texture a slight Nor Bump effect for the grain of the sand, and Enable Color.
- Add a lamp.
- As you must see the steps in the sand, the light have to cast shadows, so the material used for the Beach mesh will have to cast and receive shadows.
- Add a new camera where you need it, and choose the image dimensions and format.
- Render an image at frame 150 for checking. Caution : if you render an image at frame 1, because of the grey mask over the sand, you will not be able to see any print on the beach !
- Render the whole animation and enjoy !
- Be carefull, do not put some sand on your keyboard !
This is a short movie of 11 seconds, showing the effect. 720x576 - Available in 3 formats :
• Displacement_01_MPEG2.mpg - 3.874 MB.
• Displacement_01_DivX6.avi - 1.722 MB.
• Displacement_01_QuickTime S3.mov - 3.524 MB.
I hope that you will find this tutorial usefull ! have fun with Blender !
Copyright 2005. Philippe ROUBAL. FRANCE.
The site www.3d-synthesis.com is hosted by www.amen.fr - FRANCE.